Microbiome Collection Instructions
COLLECTION REQUIREMENTS
Before proceeding, please read these instructions carefully. Without taking these precautions, your results may be inaccurate or result in a possible recollection.
IMPORTANT PRE-COLLECTION INFORMATION
This is a ONE DAY stool collection sample.
Collect the stool specimens on either a Monday, Tuesday or Wednesday ONLY.
Keep fluid in the GREEN TOP and ORANGE TOP vials away from eyes and skin. If contact occurs, wash area thoroughly with water.
DO NOT inhale, ingest or discard the fluid in the GREEN TOP or ORANGE TOP and vials.
Keep out of reach of children.
Pre-collection timeline
- 12 weeks before the test: Cease taking antibiotics, anti-fungals and antimicrobial herbs, unless instructed otherwise by your practitioner.
- 23 days before the test: Cease taking oral castor oil, probiotics, laxatives, aspirin and anti-inflammatory medication. Also cease taking all gut associated supplements like pre- and probiotics, digestive enzymes, detox/liver herbs, minerals and amino acids, unless instructed otherwise by your practitioner.
- 32 days before the test: Follow your normal diet, including the following foods if possible: meat, fish, poultry, vegetables (raw and cooked), carbohydrates (potatoes, rice, pasta, bread), fats (butter, margarine, oils). If you do not eat some of these foods, you can still do the test. Vegetarians and vegans should eat their normal diet.
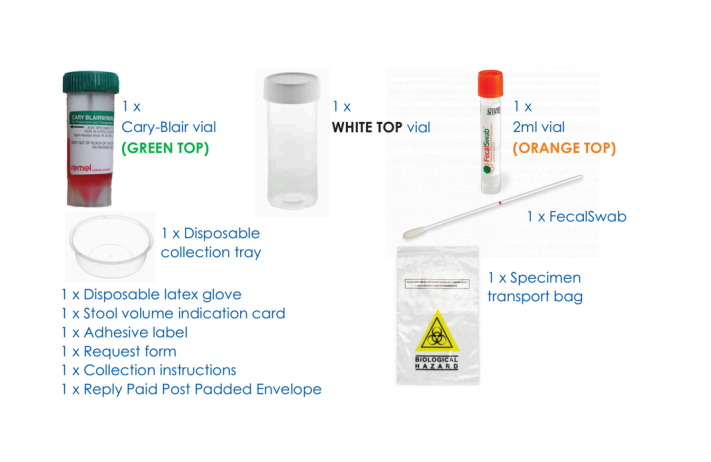
Microbiome Collection Kit Contents
Check contents of kit. If items are missing OR you have any questions regarding this kit, please contact Customer Service on 1300 688 522.
You will need to return stool specimen in the WHITE TOP, ORANGE TOP and GREEN TOP vials.
PART 1: WHITE TOP SPECIMEN COLLECTION
- 1On the day of collection, put latex glove on, then pass urine into the toilet if necessary.
- 2Pass stool onto the collection tray without contaminating it with urine.
- 3Using the spoon handle inside the cap of the WHITE TOP vial (no liquid), collect several portions of the stool from areas of various colours and textures, including any visible blood or pus. Continue to add until the WHITE TOP vial is half to three-quarters full. Once completed, tighten the cap.
- 4DO NOT discard the stool in the collection tray.
- 5Proceed to PART 2 for the Faecal Swab (ORANGE TOP) collection instructions.
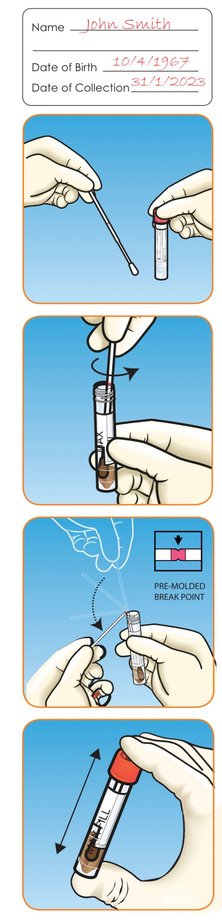
PART 2: ORANGE TOP FAECAL SWAB
- 1Complete all details on the adhesive label provided and apply label to the ORANGE TOP vial.
- 2Remove the swab from the peel pouch. Hold the shaft applicator above the marked breakpoint. Do not touch the swab tip.
- 3Insert the tip of the swab into the stool sample tray and twist until it is evenly coated in stool. DO NOT spoon or scoop the specimen with the swab.
- 4Remove and examine to make sure there is faecal material evenly coated around the tip of the swab. Transfer the swab into the ORANGE TOP vial and check that the "MAX FILL" line on the label is not exceeded.
- 5Holding the swab shaft, mix the stool specimen against the side of the ORANGE TOP vial to evenly disperse the stool into the liquid.
- 6Hold the vial away from your face. Holding the end of the swab shaft, place the marked breaking point against the rim of the vial. Ensure you are holding the swab shaft securely.
- 7Bend the swab to break at the marked breakpoint. If needed, gently twist the shaft between thumb and forefinger to completely remove it. Discard the broken upper part of the swab shaft and tighten the cap.
- 8Shake the vial until the sample has been thoroughly mixed.
- 9Proceed to PART 3 for the GREEN TOP collection instructions.
PART 3: GREEN TOP SPECIMEN COLLECTION
- 1Using the spoon handle inside the cap of the GREEN TOP vial, collect several portions of the stool from areas of various colours and textures, including any visible blood or pus.
- 2Continue to add and mix stool through liquid until the TOTAL MIXTURE reaches the bold black line. DO NOT remove any of the solution if it has exceeded the bold black line, simply ensure the lid is secured tightly.
- 3On the right hand side of the label of the GREEN TOP vial, indicate the stool appearance by ticking one of the four boxes (Watery, Loose, Formed, Bloody).
- 4Make sure the GREEN TOP cap is tightly secured and shake the vial vigorously to ensure the sample has been thoroughly mixed.
- 5Proceed to PART 4 for instructions on packing and returning the samples.
PART 4: PACKING AND RETURNING SAMPLES
- 1Label the WHITE TOP, GREEN TOP and ORANGE TOP vials with your name, date of birth and the date of sample collection.
- 2Put the labeled vials into the re-sealable section of the specimen transport bag. Specimens should be stored in a refrigerator until ready to be transported (DO NOT freeze).
- 3Complete the Nutripath Patient Checklist Form to ensure there are no delays in receiving your results. Ensure your Questionnaire Form is complete and all the information is correctly stated on your Nutripath Request Form (including full name, date of birth, address and phone number).
- 4Once completed, place ALL THREE stool specimen vials into the unsealed section of the clear specimen transport bag.
- 5Place the specimen transport bag (with the contained vials), the completed Questionnaire Form and the Nutripath Request Form.
- 6If you wish to track your sample, please take note of the tracking number listed on the Reply Paid Post Padded Envelope.
- 7It is highly recommended to post the samples on the SAME DAY. If unable to post on the same day, please keep samples refrigerated for one night only and post the following day. DO NOT freeze.
- 8Results of this test are typically back in 2 weeks - check your i-screen dashboard for progress updates.
Thank you for choosing i-screen. Results will be released in your i-screen dashboard where ready.
View your dashboard